New Logo

NUMBER 1188
March 10,2009

Kentucky Pest News Newsletter
IN THIS ISSUE
TOBACCO
-Tips on Managing Diseases on Tobacco Seedlings in 2009
-Chemical Options for Managing Diseases on Tobacco Transplants
-Omission of Fungicide Information in ID-160
FRUIT CROPS
-Early Spring Apple Disease Management
LIVESTOCK
-Winter, A Time for (L)ice and Snow
-Eastern Tent Caterpillar Outlook
FORAGE
-Weed Management Options for Grass Pastures Following a Dry Summer
PESTICIDE NEWS
-Differences in Federal and State Pesticide Recordkeeping Requirements for Private Applicators
-Be Prepared for Pesticide Spills-The Pesticide Spill Kit


TOBACCO

Tips on Managing Diseases on Tobacco Seedlings in 2009
By Kenny Seebold


At the moment, tobacco producers around the state are getting into high gear to begin growing transplants.  Healthy transplants are a cornerstone of a successful tobacco crop, and disease in the float system often interferes with the production of high-quality seedlings.  Planning and preparation now can lead to better disease control and better yields of transplants in the spring.

A preventive approach is a must to be successful against the pathogens that we encounter in the float system.  The disease-conducive environment and limited number of fungicide tools dictate this type of approach.  Here are some considerations in developing a preventive disease management strategy:

  • Avoid the introduction of plant pathogens into the float system.  Water from ponds or creeks can harbor fungi like Pythium or the black shank pathogen that devastate a float bed. Keep soil out of float bays – this can also cause certain plant pathogens to be introduced into the system.  Produce your own plants, or buy from a Kentucky source if at all possible.  Historically, blue mold has been introduced into KY from plug plants that originated in Florida.  Those growers that still utilize the plug-and-transfer system should consider buying KY-grown plugs or those produced in northern areas.  Contact your dealer or the UK Cooperative Extension Service for more information. 

  • Seed into clean, sanitized trays.  New trays will not harbor plant pathogens, but re-used trays pose more of a risk.  Trays can be sanitized by dipping or spraying trays with a 10% bleach solution.  Afterward, cover trays and allow them to stand overnight, and follow up with a good rinse to remove bleach residue.  Trays that have been used for several years will be difficult to sanitize effectively with bleach.  Steaming older trays at 165-175 °F for 30 minutes is the most effective way to eradicate pathogens, but watch temperature and steaming time carefully to avoid damage to trays.

  • Dispose of unused or diseased plants quickly and properly.  Bury or burn the plants, or discard them at least 100 yards from float beds or tobacco fields.

  • Keep your transplants as stress-free as possible.  Avoid temperature extremes and keep fertilizer levels in recommended ranges.  Plants that are under- or over-fertilized are more susceptible to diseases in general.

  • Maintain good air movement through the use of side vents and fans.  Keep the area around float beds weed-free.  Good airflow promotes rapid drying of foliage, creating less favorable conditions for diseases.

  • When clipping plants, use a high-vacuum clipper to avoid the buildup of leaf matter in float trays.  Some pathogens use leaf debris as a food base to become established and then spread in the float system.  Sanitize your mower regularly with bleach to avoid pathogen spread.

  • Consider a regular fungicide program to control root and leaf diseases.  Fungicides are cheap insurance considering the high value of your transplants.  Consult ID-160, the 2009 Kentucky Tobacco Production Guide, for specific recommendations.

Disease-free transplants pay dividends down the road because they are more vigorous and less prone to attack by pathogens in the field.  Proper management of diseases in the float system will help insure that your tobacco crop gets off to a good start.


Chemical Options for Managing Diseases on Tobacco Transplants
By Kenny Seebold


Tobacco producers in Kentucky are faced with several diseases each year that have the potential to cause serious losses, and the majority of these can be managed with an integrated strategy that includes cultural practices and fungicides/bactericides.  In this article, we’ll focus on the fungicide tools that can be used to manage fungal and bacterial diseases on tobacco transplants.

The most commonly encountered fungal diseases in the float system in KY are, in order of importance, Pythium root rot, target spot, Rhizoctonia damping-off, Sclerotinia collar rot, anthracnose, and blue mold. The latter does not occur each year, but can be devastating when it appears on tobacco seedlings.  Bacterial diseases are found less frequently and include black leg (bacterial soft rot) and angular leaf spot/wildfire.  Black leg is by far the most common of the bacterial diseases seen in float systems.

The following is a summary of labeled chemical products that can be used in the float system to manage diseases in 2009.  Detailed information on these products and their use can be found in ID-160 (2009 Kentucky & Tennessee Tobacco Production Guide) or in PPFS-AG-T-8, the 2009 Fungicide Guide for Burley and Dark Tobacco.

Agricultural streptomycin.  This material, an antibiotic, is sold as Agri-Mycin 17 and Firewall.   Apply at rates of 100-200 ppm (1-2 tsp of product per gallon of finished spray) for control of angular leaf spot/wildfire and suppression of black leg.  Use the lowest rate for prevention and the higher rate when disease is first observed.  Apply 3-5 gallons of solution per 1000 sq. ft. of bed as a fine mist to achieve thorough coverage.

Mancozeb.  Mancozeb, the active ingredient in Dithane DF, Manzate ProStick, and Penncozeb 75DF, is the only broad-spectrum material labeled for use in the float system.  Adequate control of anthracnose and blue mold can be achieved with mancozeb, along with suppression of Rhizoctonia damping-off and target spot.  The use rate is 0.5 lb of product 100 gallons of finished spray, or 1 tsp per gallon.  Apply 3-12 gallons of solution per 1000 sq. ft. as a fine mist; increase spray volume as plants grow to get thorough coverage of leaves and stems.  To avoid injury, begin applications when plants are dime-sized or bigger and continue on a 5-7 day schedule until transplanting. 

Terramaster 4EC.  Excellent control of Pythium root rot is possible if Terramaster EC is used as part of a preventive program.  Proactive management of Pythium root rot is the recommended course, since diseased root systems are ideal targets for other root pathogens, such as Phytophthora nicotianae (the black shank pathogen) or Fusarium, after the tobacco is transplanted.  Even if curative treatments of Terramaster are used, a certain level of disease remains and increases the risk of loss to soilborne pathogens after setting. 

For preventive use, apply 1 fl oz of Terramaster per 100 gallons of float water 3 weeks after seeding or when roots first enter the water.  Follow up 2-3 weeks later with a second treatment at 1 fl oz/100 gallons of float water.  Finish with a third application of 0.8 fl oz/100 gallons of float water two weeks after the second application.  In systems with new or adequately sanitized trays, one or two applications beginning at 3-4 weeks after seeding should provide good protection against Pythium root rot.  For producers still using the plug-and-transfer system, make the first application of Terramaster 1 week after plugging to allow initiation of root growth and minimal risk of injury.  If disease appears prior to planned treatment with Terramaster, use the curative rate of 1.4 fl oz/100 gallons of float water, beginning no earlier than 3 weeks after seeding.  Make a second application, if needed, at 1-1.4 fl oz/100 gallons of float water 2-3 weeks after the first treatment.

Phytotoxicity is a concern with Terramaster; however, the risk of damage caused by the fungicide is almost always outweighed by the benefits of its use.  The most common type of injury that we see is root burn, followed by sloughing off of water roots following treatment.  The degree of root burn increases when higher rates of the fungicide are used, but in nearly all cases plants will recover.  Some delay of growth is also common but rarely causes lasting damage to seedlings.  Foliar injury such as bleaching (whiting) and distortion of leaves is common in cases where excessive rates of Terramaster have been applied, or where the product has not been mixed thoroughly in the float bed (which results in “hot spots” in the bed).  Injury tends to be worse in water with a pH above 7.  We receive occasional reports of premature flowering associated with Terramaster use.  It is not believed that Terramaster actually causes premature flowering, but can aggravate the situation if plants have been grown under environmental conditions known to cause this disorder.  To minimize the risk of phytotoxicity, do not exceed recommended rates and take steps to ensure uniform distribution of Terramaster in float beds.  If necessary, adjust pH levels in the float bed prior to treatment.  Never apply Terramaster “over the top”; the risk of foliar injury increases substantially and poor control of Pythium root rot could result.  Do not apply Terramaster any later than 8 weeks after seeding.

As you can see, the list of materials that can be used legally in the float system is fairly short and doesn’t address all of our disease problems.  For example, we don’t have a labeled fungicide option for control of Sclerotinia collar rot.  A number of products not included in this list show up in greenhouses and farms around Kentucky each year – it is critical to avoid unlabeled products or off-label uses.  Plant injury (and loss) and worker safety are of concern, and ultimately illegal chemical use could make tobacco unacceptable to buyers.  On the positive side, careful and preventive use of cultural practices and chemicals will give growers the best possible control of important tobacco diseases and allow them to build a strong foundation for the 2009 crop.

BACK TO INDEX

Omission of Fungicide Information in ID-160
By Kenny Seebold


We’ve learned recently that a portion of the table in ID-160 (2009 Kentucky & Tennessee Tobacco Production Guide) related to the use of mefenoxam for control black shank (Table 3, p. 31) were omitted inadvertently.  Unfortunately, we cannot correct this problem with the print version; however, the online version has been revised to include the missing information.  Fungicide information can also be found in PPFS-AG-T-8, the 2009 Fungicide Guide for Burley and Dark Tobacco.

FRUIT CROPS

Early Spring Apple Disease Management
By John Hartman


Many apple growers in Kentucky are now engaged in orchard pruning and other late winter and early spring activities.  Each season, apple diseases are a threat to orchard productivity and fruit quality.  Now is an important time for fruit growers to manage some of these destructive diseases.  Cultural practices applied these last days of winter and early spring will help to reduce disease in the crop next summer.

There are many cultural practices that can be implemented now and in the coming weeks to reduce the threat of diseases such as apple scab, fruit rots, powdery mildew, collar rot, fire blight, and cedar-apple rust.  The following are cultural practices beneficial for reducing apple diseases:

  • Apple Blight Canker
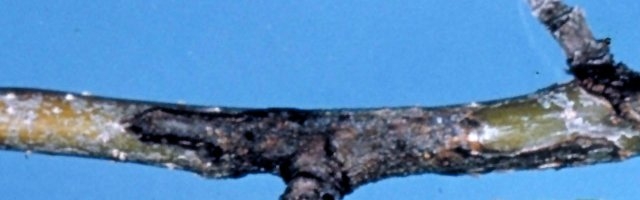
Sanitation - prune out last year's infections, cankers, and any dead wood while the trees are dormant.  Dead and diseased wood provide a reservoir for spread of fungi and bacteria to nearby healthy trees or parts of trees.  Figure 1 illustrates an apple fire blight canker which should be pruned out of the tree.
  • Remove nearby landscape or forest trees or overhanging tree branches that might shade the fruit trees.  Shade on apple trees means that susceptible leaves will remain wet longer following rain or dew, thus increasing the chances of infection by disease-causing fungi.
  • For apple and pear disease management, especially fire blight, remove and destroy any abandoned and unsprayed apple or pear trees near the orchard.
  • Fire blight, a bacterial disease, was severe locally last year in many Kentucky orchards and backyard apple and pear trees.  If the disease was serious last year, extra measures may be needed.  Very early season (dormant to silver tip) applications of fixed copper sprays are helpful in fire blight management.  These sprays serve to reduce epiphytic (tree surface) populations of pathogenic bacteria in the orchard.  Apply copper sprays to the entire orchard block, including cultivars not considered susceptible to the disease.  The reason for treating non-susceptible cultivars is that even cultivars that normally are not very susceptible to fire blight, such as Red Delicious, can be colonized by fire blight bacteria and serve as a source of infection to other, more susceptible trees during bloom.
  • Remove and destroy nearby susceptible cedars and junipers if possible, or at least remove and destroy galls on cedars and junipers too valuable to cut down.  Cedar-apple rust galls are visible on cedar twigs and branches now, appearing as brown, somewhat-spherical galls an inch or two in diameter.  They will be even more visible during moist periods next month when the orange, gelatinous telial “horns” appear.  If cedars or junipers are not present within 200 yards of the orchard, cedar rust diseases are not likely to be a serious problem for the orchard.
  • Thin apple tree branches during the dormant pruning operation to open up the trees to better sunlight penetration.  Again, speeding up leaf surface drying reduces chances for foliar diseases.
  • Remove prunings from the orchard and destroy them.  The pathogens in those dead and dying branches can be moved by insects, wind, and rain back into the orchard, if left nearby.
  • Mummy CAK
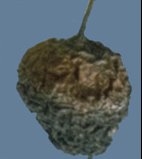
Mummies (dried, shriveled fruits from last year) should be removed from the tree, picked up from the ground, and destroyed.  Many of these mummies contain disease-causing fungi which, if left in the tree, could start a new epidemic.  Figure 2 shows an apple black rot fruit mummy.
  • Rake up and destroy all fallen leaves from the previous season or chop fallen leaves into tiny pieces with a power mower before spring.  The fungus that causes apple scab overwinters on fallen leaves and develops spore-producing capability in the spring.  Removing the previous season’s diseased leaves or chopping them up finely is an important step in apple scab management.  A mulch or flail mower, used in the orchard before April, can reduce the risk of scab considerably (perhaps 80 to 90%) if all of the leaf litter is shredded.  Some growers apply 5% urea (42 lb/A of urea dissolved in 100 gal of water) to the ground in early spring up to the time of silver tip development.  This treatment may reduce spore production (perhaps 60 to 90%).  If urea is used to aid in scab management, nitrogen fertilization must be adjusted accordingly.
  • Incorporate apple disease resistance into the orchard disease management program by selecting scab-resistant apple trees, fire blight-tolerant apple varieties and rootstocks, and collar rot-tolerant rootstocks.  Use only disease-free nursery stock when planting a new block of trees.
  • Provide good soil drainage.  Underground tiling will help improve internal drainage of heavy soils.  Soil contaminated with the collar rot fungus should not be moved about.
  • Remove and destroy weeds, undergrowth and brush from near the orchard; these plants may harbor pathogenic microbes.
  • Be prepared to monitor for disease-favorable weather conditions.  Springtime is the most important time to prevent diseases because by preventing early-season primary infections, secondary infections are also avoided.
  • Read and understand the 2009 Commercial Tree Fruit Spray Guide and develop ways to integrate fungicide applications into the total apple disease management program.
  • Purchase necessary fungicides so that they are available when they are needed during the growing season.  Calibrate sprayers so that correct amounts of fungicide are applied.

For more specific information concerning tree fruit diseases and control recommendations, please consult the current U.K. College of Agriculture Commercial Tree Fruit Spray Guide 2009 (ID-92) or the Midwest Tree Fruit Handbook (ID-93).  These publications are available at County Extension Offices statewide.  More detailed information about symptoms, causal organisms, disease cycles, epidemiology, and control of apple diseases can be found in the Compendium of Apple and Pear Diseases available from The American Phytopathological Society, 3340 Pilot Knob Road, St. Paul, MN 55121.


LIVESTOCK

Winter, A Time for (L)ice and Snow
By Lee Townsend


This article is prompted by a sample of goat biting lice that arrived this week. Lice are potential winter pests on most livestock species.

Lice
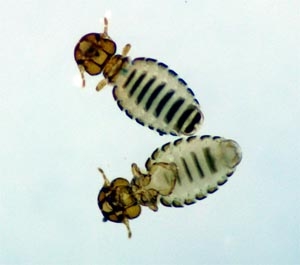
Goat biting lice are tiny (1/16 inch long) insects with light colored bodies marked with dark cross stripes (see picture). They have wide heads in contrast to the narrow heads of sucking lice. Biting lice live on the skin surface where they feed on flakes, bits of hair and other skin surface debris. Numbers on animals are greatest during the winter and into spring. Populations will decline during the summer months but small numbers of lice will survive on some animals.

The entire life cycle from egg to adult takes about a month and is spent on the host. Infestations are spread throughout a herd by direct contact. Biting lice are annoying but they are not blood feeders like the sucking lice species that attack goats.

Suspect lice as a potential cause of animal restlessness, continual rubbing or scratching, or loss of hair. If lice are the cause, careful inspection of the skin surface along the top line of the animal should reveal the light-colored fast moving insects; nits may be seen glued to wool fibers. You should see insects of different sizes, nymphs resemble adults but are smaller.

Python Dust, Ultra Boss Pour On, or sprays with products such as Permectrin (permethrin) can be used for louse control. It is necessary to make 2 applications about 2 weeks apart because the egg stage (nit) is not killed by insecticides. The second application should kill lice that hatched after the first treatment. The entire herd should be treated.


BACK TO INDEX


Eastern Tent Caterpillar Outlook
By Lee Townsend


Eggs of the eastern tent caterpillar (ETC) that were laid in masses on twigs of wild cherry and related trees last summer will begin to hatch soon. Historically, egg hatch occurs around the third week of March in central Kentucky but can occur a week or two earlier or later depending on weather conditions each year.  Populations of the ETC have increased noticeably over the past three years. While infestations of the magnitude seen during the MRLS outbreak are not anticipated, it is clear that ETC populations are on the upswing and could be heavier than normal in some areas. Assessments and management decisions can be made in a few weeks as the silvery baseball-sized tents start to show up on branches.

The ETC is an early spring so the caterpillars can cope with the erratic weather patterns that can occur in March and April. Development, including egg hatch, occurs when the temperature is above 37o F. At 50o F it takes about a month for all eggs to hatch. Warmer conditions will promote hatch over a shorter period of time and give a more synchronized population.

BACK TO INDEX


FORAGES

Weed Management Options for Grass Pastures Following a Dry Summer
By J.D. Green


Dry weather conditions during the past two summers have resulted in grazed pastures with areas that have bare soil and thin vegetative cover.  Fields with thin stands of desirable pasture species are more likely to contain winter annual weeds such as chickweed, henbit, purple deadnettle, and mustard species.  As these cool-season weeds die back, warm-season weeds will emerge and take their place.  Other weeds such as buttercup and musk thistle are also likely to be more abundant this spring.  Broadleaf pasture herbicides such as 2,4-D will aid control of buttercup and musk thistle; however, 2,4-D alone is not very effective for control of other plants such as chickweed.  Therefore other labeled herbicide options should be considered. 

The first step in determining weed management options is to do a critical evaluation of pasture fields in the early spring.  Scout fields looking for any developing weed problems.  Identify areas of the field with potential problems such as biennial thistles, poison hemlock, buttercup, chickweed, or spring mustard species.  Also, assess the growth of desirable forage grasses and legumes. 

The primary question then becomes – does the existing stand of desirable forages appear to be healthy and potentially competitive against any emerging weed problems?   If the forage stand is acceptable and weed pressure is light, then the best course of action is likely to do nothing this spring except other routine pasture management practices.  However, if you do see developing weed problems then you may want to take action in early spring to begin to correct these problems.  In some cases there may not be any good solutions that will correct all weed problems observed.  Highlighted below are some points to consider as you make those decisions.

After evaluating the field, you must decide whether or not to 1) overseed or drill more forages into an existing pasture to improve the stand of desirable forage grasses or 2) spray to control emerging broadleaf weeds.   You will not be able to do both practices in the spring since most broadleaf herbicides have the potential to injure newly emerging forage grasses.   For most broadleaf pasture herbicides such as 2,4-D it is generally recommended to wait 4 to 6 weeks after spraying before reseeding forage crops.  Other broadleaf herbicides may require a 6 month or longer waiting period between application and seeding forage legumes and grasses (consult the label of specific herbicide products used).   As a rule of thumb, if you decide to spray this spring you will need to wait until late summer or fall before seeding additional forages.   If you decide to reseed first, then it is recommended that you wait until the new seedlings have become well established with a good root system before making a herbicide application this summer.  It is important to also note that broadleaf type herbicides cannot be used in fields where desirable clovers or other legumes have been seeded.

Another alternative to consider is the use of a more complete pasture renovation technique to control or suppress growth of the weedy vegetation followed by interseeding more forage grasses or legumes.  This assumes that the field is not needed for grazing animals until the newly seeded forages become well established.  In this approach a herbicide product containing paraquat (eg. Gramoxone) is applied to kill back winter annual weeds.  Leaves of actively growing forage grasses will also be “burned back” by the paraquat application, but established plants are not likely to be killed.  Desirable forage grasses and legumes which have a good root system should regrow and resume active growth within a few days after treatment.   Since paraquat has no soil-residual activity, desirable forages can be interseeded into the soil immediately after herbicide application.  Paraquat is a “Restricted Use” pesticide, only licensed and certified applicators are allowed to purchase and apply it.  Weedy plants such as curly dock, chicory, or Canada thistle with perennial roots or other weeds with established taproots (such as musk thistle) will likely survive this treatment.

Another course of action is a “wait and see” approach.  But, keep in mind that smaller weeds are easier to control than after they increase in size.  Specific details on herbicides labeled for use on grazed pastures and hay fields and their effectiveness on target weed species can be obtained in the University of Kentucky Extension bulletin, Weed Management in Grass Pastures, Hayfields, and Fencerows (AGR-172) available at http://www.ca.uky.edu/agc/pubs/agr/agr172/agr172.pdf .

PESTICIDE NEWS
Differences in Federal and State Pesticide Recordkeeping Requirements for Private Applicators
By Lee Townsend


According to federal requirements, and information in the USDA Recordkeeping Manual for Private Applicators, records of all Restricted Use Pesticide (RUP) applications must be made within 14 days of the application. Also, the records must be kept for a period of two years from the date of application. However, Kentucky Pesticide Regulations require that private applicators keep records of both general and restricted use pesticides for 3 years from the date of application. State laws and regulations may be more stringent than federal laws but cannot be more lax.

Be Prepared for Pesticide Spills- The Pesticide Spill Kit
By Lee Townsend


Pesticide spills can happen to the most careful applicator. Knowing how to react and having the items nearby that you need to manage a spill can limit the down side of an accident. Spills that involve undiluted concentrates can happen in the storage or mixing and loading area or while transporting pesticides from the dealer to the farm or field. Accidents also can happen when diluted sprays are being taken to fields. They can be on the farm or on public roads and highways. Differences in locations, amounts, and concentrations affect how you react but the basics are the same.

The first step in spill management is to protect yourself and those helping you by putting on the personal protective equipment that is listed on the pesticide label. Then CONTROL the spill as much as possible, CONFINE the spill, and CLEAN UP.

Having a pesticide spill kit should ensure that you have the tools to deal effectively with spill. Standard items include -
Gloves (nitrile, at least; foil barrier laminate better); goggles; shovel, broom and dust pan; spray bottle (for wetting down small spills); paper towels; permanent marker (for marking spill container after clean-up); Tyvek coverall; absorbent material such as sand or cat litter; product labels and MSDS sheets, soap and water to wash yourself after dealing with the spill.

CONTROL the spill. Small volume spills may be easy to stop but tipped over nurse tanks or field sprayers are a different story.  If the spill cannon be controlled then call for help and CONFINE liquid spills by making a dirt berm. Keep the concentrate or spray solution from reaching water. CLEAN UP effort will vary with the type and amount of pesticide that is spilled. The MSDS sheet will give specific instructions on clean up and decontamination procedures.

Call 911 if the spill can’t be controlled or contained or if someone is injured or contaminated with pesticides. Be prepared to give the location, injuries (if any)m amount and type of materials spilled. Stay with the spill and keep others away until help arrives.

Emergency numbers on the pesticide label will allow you to contact the manufacturer for advice from people who are very familiar with the products involved. CHEMTREC (800) 262-8200 is a 24-hour resource for dealing with chemical spills.

Be prepared for a spill. Have the materials you need and a plan to follow in case of a pesticide spill.


NOTE: Trade names are used to simplify the information presented in this newsletter. No endorsement by the Cooperative Extension Service is intended, nor is criticism implied of similar products that are not named.


BACK TO KY PEST NEWS HOME