
KGS Home >
Earth Science Education
Draw T. rex
Grade: 4 and up
Time: 20-30 minutes
Core content: Fossils are evidence of past life.

Objectives and summary
In this activity, students learn how scientists determine what prehistoric animals looked like based on their bones. The activity reinforces the concept that fossils are mostly the remains of hard parts of ancient life and integrates paleontology with biology. The instructor and students will use the appearance of modern animals to reconstruct what an ancient animal, a Tyrannosaurus rex (T. rex), may have looked like when it was living. The instructor will draw the T. rex on a chalkboard over a projected image of a T. rex skull. You do not need to be an artist to do this activity. Students follow along on their own worksheets. What they will see on the chalkboard is the projected image. At the end of the activity, when the projected image is turned off, all that is left is a drawing of the mighty T. rex!
Materials:
Background:
Fossils are evidence of ancient life in rock. Most fossils represent the hard remains of ancient life. In animals with backbones, called vertebrates, bones and teeth are generally the only parts of the animals that are fossilized. Soft tissues, such as skin, muscles, and hair, generally are not preserved, because they rot or are eaten before the animal is fossilized.
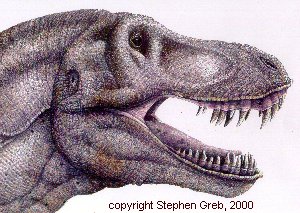
Any picture of an ancient dinosaur in a book or movie is an artist's illustration of what the ancient creature looked like. Dinosaurs are long extinct. But scientists can determine what dinosaurs looked like based on their fossils. The study of fossils is called paleontology. Paleontologists are the scientists that study fossils. Paleontologists who study dinosaurs, analyze the fossilized dinosaur bones to determine how they fit together. They compare the fossil bones to the bones of animals that live today. Dinosaurs were reptiles. Some were bird like. Others were large like elephants, and big mammals that live today. By studying the way the soft tissues, like muscles and skin, are attached or cover the bones of living animals, paleontologists can interpret how they may have attached or covered the bones of prehistoric animals. In this activity, students will be junior paleontologists. They will reconstruct what the most famous dinosaur, T. rex, looked like based on a T. rex skull and data they collect about modern animals.
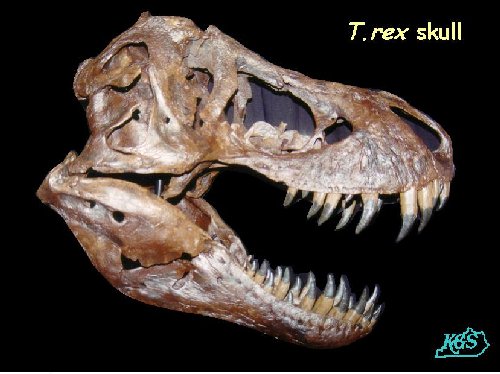
This is a cast of the T. rex skull, called "Stan." The cast is owned by Walter Gross, of Lexington, who graciously allowed us to use an image of the cast for this educational activity. You will need to make an overhead transparency from a copy of this image, or use a digital image copied to a slide, for the activity.
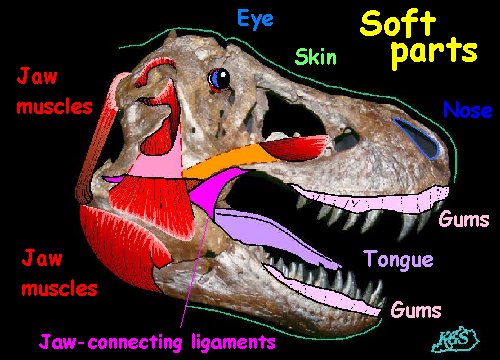
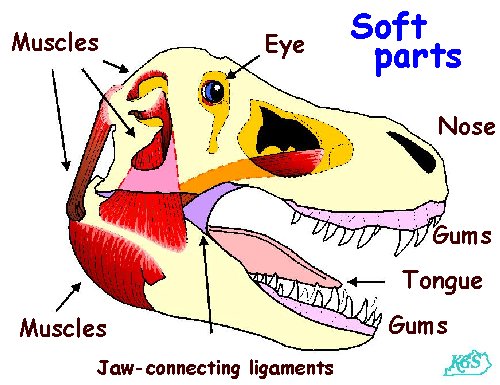
The soft parts of a fossil animal can be inferred based upon comparison of the skull to skulls of modern animals. The locations of muscles in this image are based upon illustrations in Horner and Lessem (1993), and Webster (1999) (see references). If the photograph with soft parts does not copy well, a second image using a drawing of the skull, rather than a photo, can be seen by clicking here.
Pre-activity:
a. The instructor needs to make an image of the T. rex skull provided here. Pdf file formats are provided for easy copying. If the instructor has access to a color copier, the T. rex skull page can be copied on an overhead transparency (make sure the correct kind of transparency sheet is used for your copier. The image can also be saved as a digital file from which a slide can be made at many photographic stores for use in a slide projector. Whichever method the instructor uses, you will need an image that you can project on a chalkboard.
b. An image can also be made of the T. rex Soft Parts images (either superimposed on the skull photograph or skull drawing). This may be more detailed than is needed for younger students, but will be interesting to older students who have a better understanding of anatomy.
c. Make a copy of the Draw T. rex Worksheet for each student.
d. Students should be assigned to look at pictures of large reptiles (such as crocodiles, alligators, iguanas, and komodo dragons), large mammals (such as elephants and rhinos) and large birds (such as emus and ostriches). This can be done the night before as a homework assignment, or it can be a class activity, just prior to drawing T. rex. Tell students to list adjectives that describe the skin of the animals pictured. What does the animal's skin look like (e.g., wrinkled, scaly)? What do the animal's eyes look like? Do the animals have tongues? What colors are the animals (e.g., green, brown)? If the animal's skin have patterns, what kinds are there (e.g., stripes, spots)?
Activity
1. Ask the students to define fossils. Most will say bones or dinosaur bones. Stress that fossils are any evidence of ancient life in rocks, not just bones. But bones are fun. Dinosaur bones are even funner. Ask the students, what scientists who study dinosaur bones are called. Define paleontologists. Paleontologists are scientists who study fossils. Tell the students that today they are junior paleontologists, and they are going to draw the king of the dinosaurs, T. rex, but they are going to draw T. rex based on data, a T. rex skull, just as a paleontologist would.
2. Explain to students that dinosaur fossils are mostly just the remains of the hard parts of these ancient animals. Ask them, if they know what parts of a human body are likely to be fossilized? Bones and teeth would be most likely. For younger students, the instructor might point out the fact that there are bones under the skin. If they hold up their hands to a light, they may be able to see their finger bones. Have them tap their teeth. These are hard parts. What are the soft parts of their bodies? Have them pinch and pull up the skin from their wrist. Have the students make a muscle with their arms. Explain that muscles occur beneath the skin and these are not generally preserved as fossils. Other soft parts of the body, like tongues and eyes, can also be pointed out. These are not preserved as fossils, but paleontologists can infer where they would have occurred in ancient animals based on their position in modern animals.
3. Now hand out the Draw T. rex Worksheet to each student. Make sure to tell them not to start yet. Each student will need a pencil. If there is time for students to color their drawings, they can do that in the last step or as a homework assignment. It is easier to draw most of the activity in pencil, so that any mistakes may be erased along the way.
4. Dim the lights in the area in which the chalkboard occurs and project the T. rex skull image on the chalkboard using an overhead projector or slide projector. Explain that the drawing of the skull on the worksheet is a sketch of this photograph. The skull is a cast of a T. rex that was found in South Dakota, and is informally known as "Stan." Explain that paleontologists have to reconstruct the soft parts of Stan from the hard parts found as fossils, like this skull, and knowledge about the soft parts of living animals. If you made an additional image of the T. rex Soft Parts page show it now. The students should not draw the muscles, they will be drawing the exterior appearance of T. rex. Explain that scientists can look at how muscles and skin attach and cover the bones of modern animals and reconstruct how they may have covered ancient animals, like this T. rex. Muscle attachments leave scars on bones. Muscle movement smooths bones beneath. These subtle markings can be preserved on fossil bones, and the placement of muscles can be inferred for the fossil.
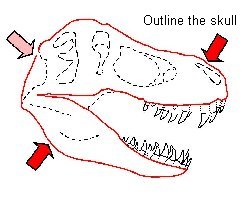
5. Ask the students, what part of the body are they looking at when they look at a T. rex skull? The head. Ask what are skull bones covered by? Skin, muscles, and other soft tissues. To draw the skin on the T. rex skull, connect the long-dashed lines on the outside of the jaws on the Draw T. rex Worksheet as shown in the figure. Do not trace the teeth yet, but connect the line at the base of the teeth that outlines the jaws. You can point out that the dashed line at the rear and bottom of the skull does not exactly follow the bones of the skull. The dashes have been drawn in these areas based on the probable position of jaw muscles, that would have been beneath the skin. The trace of the actual jaws is shown by short dashed lines. The instructor needs to demonstrate where to draw, by drawing with chalk on the chalkboard over the projected image of the T. rex skull. The instructor should also walk around the classroom to make sure the students are connecting the correct lines.
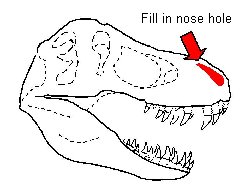
6. Next, the instructor should point to the holes in the upper jaw bone of the skull. Explain that in modern animals, holes in the skull are where noses, eyes, and muscles are located. Ask the students, which hole was probably the nose hole? If there is hesitation, ask them to think about the animals they looked at in their picture books. Are noses in the front or rear of most reptile's heads? The front.
7. Now draw the nose. You can ask the students to look at each other. What color is the inside of their neighbor's nose? Dark, or black. Tell students to fill in the nostril hole on their worksheet dark or black. The instructor should fill in the nostril hole on the projected image on the chalkboard.
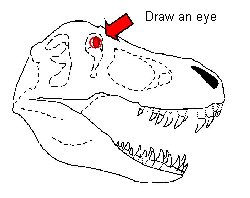
8. Ask the students, which hole do they think the eye was in? In dinosaurs, the eye hole is generally the third back from the front. It is the narrow hole on the image. Tell the students that in some dinosaur fossils, rings of tiny bones that supported the eyes have been found. The bony rings indicate that the eye occurred in the upper part of the narrow hole, as shown in the figure to the right. Have students look at the eye types on the Draw T. rex Worksheet. Several different types of eyes are shown. Some eyes are football- or saucer-shaped. Some are circular. The illustrations are provided to help students draw eyes. These are all eye shapes that modern reptiles and birds have. The instructor might ask the students if any of the eye shapes provided are similar to the animals they looked at in their picture books. No one eye shape is more right or wrong. Tell the students to draw an eye in the eye hole. The instructor should draw an eye in the eye hole on the projected image on the chalkboard. Then the instructor should walk around the classroom to make sure the students are drawing the eye in the correct position.
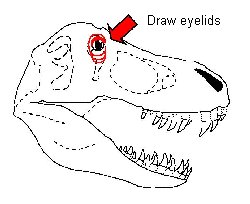
9. Next, ask the students what is around their eyes? Eyelids. Most land animals have eyelids. T. rex probably had eyelids. The instructor can draw eyelids around the eyes on the projected image. Tell students to draw U-shapes below the eyes. If you want to make T. rex look mean use heavy shading around the eyes, or make a thick black circle around the eye.
10. Students may ask about the 2nd and 4th holes on the upper skull. Explain that these were areas of muscle attachments. They also served to lighten the skull. Bone is heavy. If the holes were filled with solid bone, as in the rest of the skull, Stan might have had problems getting his head off the ground in the morning.
11. Ask students what should go between the upper and lower jaw? A mouth. Tell students not to draw the mouth just yet. They will draw the mouth in stages. First, show that the teeth have been colored in two colors on the projected image on the chalkboard. The dark part represents parts of the teeth that were worn and exposed to air. The lighter-colored part of the teeth were unworn. Ask the students, are all of their teeth exposed to the air? Is there any part hidden? What hides the bottom of their teeth? Their gums. There is some evidence that T. rex may have had gums. The fossil teeth are worn above the gum line, and smooth beneath it. To draw the gums, the instructor should connect the lines of shading on the teeth (about half way down the teeth on the projected image). On the Draw T. rex Worksheet, the teeth are drawn as solid lines as they would appear above the gums. Students should be told to draw a horizontal line that connects the base of the teeth to form the gums. Dotted lines beneath each tooth, show where the teeth occur beneath the gums. The instructor will want to walk around the classroom to make sure students have connected the correct lines. These do not need to be exact.
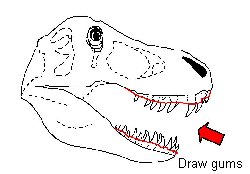
Teeth are drawn on the Worksheet, but not on the chalkboard. The instructor will need to trace the parts of the teeth that stick out above the gum line on the chalkboard. While drawing, ask the students if some of the smaller teeth on their Worksheet are below the gums? Yes. T. rex lost teeth and had teeth replaced just like the students, but the teeth were bigger and stronger. How much money would the dinosaur tooth fairy have had to leave for one of these teeth!
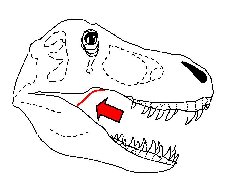
12. Next, tell the students to open their mouths. From the sides of their face, can the student next to them see all the way back in their mouth? No. Most animals, including modern reptiles have ligaments that attach the jaws together. These ligaments may be covered by skin. This can be shown with pictures of alligators or crocodiles in which the animals have their mouths opened. The instructor should sketch the jaw-connecting ligament at the back of the mouth on the chalkboard image. Tell students to do the same on their Draw T. rex Worksheet. Again, the instructor may want to walk around the room to check that the correct lines are being drawn.
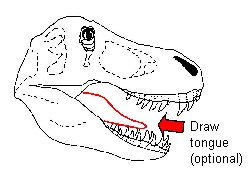
13. What else is in the mouth? A tongue. Tongues, are soft parts. They don't leave any fossil evidence. Noone knows if T. rex had a tongue, or what shape it would have been, but since most large predators and scavengers (birds, mammals, and reptiles) have tongues, you can draw a tongue on T. rex. The instructor should draw a tongue on the projected image. If students don't want to draw a tongue, they don't have to. Also, some animals have small tongues that lay on the bottom of the mouth, and can't always be seen between the teeth when the animal's mouth is open.
14. Now the face of T. rex is mostly complete. Ask the students what is missing? What is reptile skin covered by? Scales. Tell the students that some fossils have been found of dinosaur skin impressions. Most of the impressions show small pebbly scales, somewhat like the pigskin on a football or basketball. Often the skin impressions preserve wrinkling. Birds and big mammals also have bumpy, pebbly or wrinkled skin beneath their feathers or hair. Other fossilized scale impressions show large scales. You might want the students to describe the scales that modern reptiles have. Many reptiles have combinations of different scale patterns, especially around their face. A close-up picture of an iguana can be used as an example. Have the students look at the choices of scale patterns they are provided with on the Draw T. rex Worksheet. The instructor may want to draw each type on different parts of the projected image on the chalkboard to show students how they are drawn. Simple patterns have been chosen to make this step easy. Stress that no one scale pattern is more correct than another. Tell the students to be creative. They can model the scale pattern after a living animal from the books they've looked at, or use their imagination. The instructor and students should now cover their T. rex head with scales. This will take approximately 5 to 10 minutes.
15. When the instructor is drawing scales, they may point out that some modern reptiles have patterns on their skin. These can be patterns of scales, or patterns of colors across scales. Ask students what patterns they may have seen on modern reptiles in picture books. Many modern animals have patterns in order to blend in with their environment. This is called camouflage. Stripes help to camouflage animals in areas of tall, straight plants. Spots and blotches help camouflage animals in shrubby or leafy areas. Both predators and prey use camouflage.
Large animals often have no patterns. The instructor may want to use an elephant as an example. Uniform color helps elephants with heat control. Large birds like emus and ostriches also tend to be uniform in color. This may also have been the case with large dinosaurs. Uniform color in large modern animals also can result from large animals brushing and scraping into plants, rocks, and trees much of their life. Uniform color can also be a type of camouflage. Lions are uniformly tan in color, which helps them blend in with the tan grasses of the African Savannah. Tell students they can draw patterns on their T. rex, or not, its up to them. There is no right or wrong answer.
You could also add some feathers to the back of your T-rex drawing. Although it may seem strange, theropod dinosaurs like T-rex are very closely related to birds. In fact, fossils of cousins of T-rex have been found which were covered with feathers. Feathers are not easily fossilized, but several recent fossil discoveries in China with exceptional preservation of fossil details, indicate that smaller and older ancestors of tyrannosaurs were covered with feathers. Some theropod dinosaurs had downy feathers covering their bodies or parts of their bodies. Some smaller theropods, for example the droemaeosaurs (commonly called "raptors"), also had longer feathers protruding from their arms, legs, and tails. They weren’t birds, just dinosaurs with feathers! So far, no T-rex fossils have ever been found with feathers. Feathers, however, are not commonly preserved, and T-rex is very closely related to dinosaurs that had feathers, so it’s possible that T-rex was covered with feathers.
16. This activity can be done in black and white or color. If you want to use color, ask students, what colors they saw in modern reptiles and other large animals? Grays, greens, and browns are most common in modern reptiles. Large animals also tend to be gray and brown. But birds can be very colorful. There is mounting evidence that birds are related to dinosaurs. In fact, in a National Geographic article (v. 196, no. 5, p. 98-99) on feathered dinosaurs, C. Sloan (1999) paints T. rex hatchlings with feathers. Some dinosaurs may have been colorful. Bright colors are used in many animals to attract a mate (boyfriend or girlfriend). Again, students can be creative. Students can color their T. rex in the classroom, or if time is running out, they can color them at home.
17. Now the instructor should turn off the projected image, which generally is brighter than the drawing the instructor made. When the projected image is turned off, what remains on the chalkboard (like magic) is a drawing of T. rex. This may be greeted with gasps and exclamations. Explain that they all started with just the hard parts, and based on what they know about modern animals, have reconstructed what Tyrannosaurus rex looked like in life. Have the students compare their pictures. Do they all look the same? No. Yet they all started off with the same data, the hard parts, or skull of a T. rex. Differences occurred because of the different ways each student reconstructed the soft parts. This is one of the reasons pictures of ancient animals in picture books often look different.
For more information on Tyrannosaurus rex in books:
For more information on Tyrannosaurus rex on the Internet: