The Klinkhammer Special
Since first being devised some twenty years or so ago by Hans van Klinken
the Klinkhammer Special has been recognized in Europe as one of the premier emerger
patterns for trout and grayling. While it isn't as well known in the United States the
variation on it given here has proven to be an extremely effective fly for both warm water
and cold water fish in the Southeast. It was originally tied on the Partridge K12ST hook,
but that is a hook that can be difficult to find in many parts of the U.S., though now
there are some equivalents by other manufacturers. David Allerton's version given here
adapts it to the more readily available Mustad 94840 hook, utilizes colors that work well
in the Southeast and employs foam for better floatation and visibility. You'll find both
versions below and I encourage you to adapt the colors and materials to your own preferences
for your particular area. For whatever variation that you would like to try it is
important to remember that the fundamental of the fly is that the abdomen of the fly float
underneath the surface of the water to attract the fish and improve hookups while the
parachute hackle and foam or wing be on or above the surface of the water for visibility and
floatation. Keep that in mind in tying and fishing the fly and you can't go far wrong.
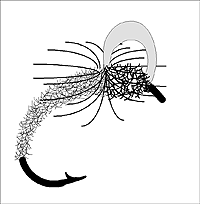
The Klinkhammer Special
(Southeast Version)
 PATTERN:
Hook: Mustad 94840 #10-18 with the front end bent downwards slightly
and the gap opened a bit to accomodate the bend.
Thread: Black or olive
Rib: (Optional) Gold wire
Abdomen: Olive hare's ear dubbing
Foam Hump or Covert: Yellow or white flat foam cut into a strip 1/8" wide.
Hackle: Yellow dyed grizzly wrapped as a parachute around the foam tie in point between
the abdomen and thorax.
Thorax: Olive hare's ear dubbing mixed with yellow hare's ear dubbing and/or antron dubbing.
This should be a very coarse dubbing and in the larger versions may need to be applied
with a dubbing loop.
Tying Instructions:
1. The first part of tying this fly is preparing the hook. Take a Mustad 94840 hook and
bend the front end slightly downward at a point about 1/4 shank length behind the eye of
the hook. On larger hooks you don't need to position the bend point as far backwards as
you do on smaller hooks. Then open the gap of the hook slightly so that you don't
decrease your hooking power.
2. Start your thread at the point where you bent the hook and wrap it backwards to the
hook bend. If you are going to rib the fly you should tie in your ribbing material by
one end as you do this.
3. Dub the abdomen forward to the bend that you put in the hook. The abdomen should
have a taper to it with the thinnest point being at the back of the hook.
4. Cut a piece of flat foam into a strip about 1/8" wide. Tie it in by one end at the
front of the abdomen.
5. Tie in a piece of grizzly saddle hackle by its tip and then wrap it a couple of times
around the base of the foam piece that you have just tied in. Secure it to the hook with a
couple of turns of thread and cut off the excess. You are forming what will be a parachute
style hackle around the base of the foam, but still leaving the free end of the foam unsecured at
this point.
6. Dub the thorax of the fly thicker than the forward end of the abdomen. Finish dubbing
slightly behind the eye of the hook leaving room to tie in the free end of the foam.
7. Pull the free end of the foam forward forming a hump over the top of the thorax. Take a
couple of turns of thread to secure it in place just behind the eye of the hook. Trim off
the excess foam. Lash down the foam a little more and then whip finish.
The Klinkhammer Special
(Traditional Version)
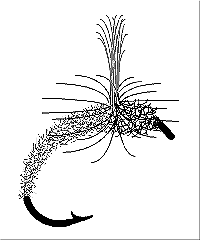 Pattern:
Hook: Partridge K12ST, Daichii 1130 or other long shanked curved hook, #10-18
Thread: Black
Wing: White or colored poly yarn
Abdomen: Tan poly dubbing
Thorax: Peacock herl
Hackle: Brown or dun hackle tied in parachute style at the base of the wing
Tying Instructions:
1. First prepare the hook. Bend the hook downward slightly just at the middle of the
hook shank.
2. Start your thread just behind the eye of the hook and wind to a point about 1/8 to
1/4 behind the eye of the hook. This distance will be shorter on larger hooks and longer
proportionally on smaller hooks.
3. Take a piece of poly yarn about twice hook shank in length that you have thinned to
the thickness that you desire for the post wing. Lay it at the thread point with about
half in front and half in back. Take a couple of turns of thread to secure it in place.
4. Trim the back half of the "wing" material to form an underbody for the abdomen/thorax
of the fly. This should be no longer than where you want the tip of the abdomen to begin
at the back of the fly and should taper from thin near the back of the fly to fatter near
the front of the fly.
5. Take your thread and wind it over the top of this poly yarn underbody to a point approx.
3/4 of the way from the eye of the hook to the point of the hook. This will be the tail
end of the abdomen of the fly. If you have any stray pieces of the poly material sticking
out the back trim them off.
6. Dub an abdomen forward to a point about 2/3 of the way from the tail end of the fly to
the eye of the hook. This should form a taper from thinner at the tail end of the fly to
fatter at the front end.
7. Tie in 1,2 or 3 pieces of peacock herl by one end (depending upon the size of the fly)
at this point and trim off the excess butts.
8. Wrap the thread forward to just in front and underneath of where the poly wing material
is emerging from the previous thread wraps. Pick up the wing material by its end and hold
it upright perpendicular to an imaginary line that runs from the eye of the hook to this
point. Take several wraps of thread in front of the winging material to make it stand
upright at this point.
9. Take the ends of the peacock herl and wrap them around the hook forward until they are
just behind the now upright post wing. Take a couple of turns of thread to secure them in
place and let the ends dangle. You will need them later.
10. Take a piece of dry fly hackle that you have previously prepared as for a dry fly.
Lash the butt of the hackle to the hook shank in front of the post wing. Move the thread
to just behind the eye of the hook.
11. Holding the hackle out of the way wrap the peacock herl forward to just behind the eye
of the hook. Take a couple of turns of thread to secure it in place. Trim off the excess herl.
12. Take a couple of turns of hackle around the base of the post wing to create a parachute
style hackle. End with the hackle tip forward over the eye of the hook. Take a couple of
turns of thread to secure the hackle in place and then trim off the excess. Whip finish or
finish with several half hitches if you have trouble getting the whip finish under the
parachute.
13. Cut the top of the post wing to the length desired - usually about « hook shank length.
Variations:
1. Vary your dubbing material as desired. The original Klinkhammer was designed as a
caddis or sedge imitation, hence the peacock herl thorax. If you are doing a mayfly
emerger then continue the dubbing in place of the peacock herl and use a finer dubbing
than you would for a Caddis imitation.
2. Use a different color dubbing as desired.
3. Use a different color hackle as desired.
Fishing the Fly:
For this fly to be presented properly it is important that the back portion of the
abdomen be below the surface of the water, while the parachute hackle, and wing or foam
rests on the surface or is on top. This may mean applying any floatant very carefully
so that it is only on the wing/foam and parachute hackle. No floatant should be applied to
the part of the fly that is to stick down into the water. It can actually be very helpful
to prewet the rear portion of the fly to get a proper presentation. Then fish it as you
would any dry fly.
BACK TO FLY TYER'S DESK INDEX


ldecuir@utkux.utcc.utk.edu