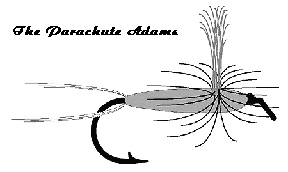
The Parachute
The idea of tying a dry fly with the hackle wound on a horizontal
plane with the shank of the hook rather than perpendicular to it has been
with us for some time, but has only become very popular in moderately recent
times. This method of tying a fly brings the body of the fly closer to the
water and thus presents (many believe) a better silhouette to the fish.
Parachute flies also have the advantage of almost never landing upside down,
on their sides, on their heads, etc. as well as just about always landing
gently. They make a very realistic presentation.
Parachutes can be tied in a wide variety of colors to represent
nearly any mayfly that you would like just by varying the materials that
are used. The basic pattern that I'm giving below is for the Adams but
also listed are variations for a Sulphur and a Blue Winged Olive. Other
variations are limited only by your imagination.
THE ADAMS
 PATTERN:
Hook: Mustad 94840, TMC 100, etc. #12-22
Thread: Black
Wing: Post wing of white or dun polyester yarn
Tail: 2 microfibetts tied in as a split tail, or brown & grizzly hackle fibres
Body: Muskrat dubbing (natural or artificial)
Hackle: Brown and Grizzly hackle wound parachute style around the post wing
Tying Instructions:
1. Start the thread just behind the eye of the hook and wind it 1/3 of the
way toward the bend.
2. Tie in a piece of polyester yarn of the appropriate diameter at this
point with most of the length pointing over the eye of the hook. (You will
trim it to length later.) Pick up the end of the polyester yarn toward the
front of the hook and take several wraps in front of it to hold it in an
upright position as a post wing. Using a fine thread such as a 8/0
Unithread helps you take the number of wraps necessary to do this without
building up too much bulk.
3. Trim the back of the piece of yarn so that it forms a taper that ends
just before the bend of the hook and then work your thread back to the bend
of the hook forming the base of a tapered body with just one turn of thread
at the bend of the hook.
4. Tie in two microfibetts as a split tail or tie in several brown & grizzly
hackle fibres as a straight tail. Many patterns call for building up a
"bump" of thread at the bend to aid in tying in the microfibetts. I prefer
to lay one piece at an angle across the hook and take one turn of thread
over the top of it. Then to lay the second piece in place and carefully
take one turn over it. Then I adjust the length and angle of the
microfibetts. Finally, a careful turn on the front side of these other two
to hold both in place and then several more working my way up the hook to
secure them firmly. This technique can be a little tricky till you get the
hang of it, but it produces a fly with a very nice taper to the abdomen and
a fine point near the tail. Finish with the thread at the bend of the hook.
5. Dub muskrat fur (natural or artificial) forward to just behind the wing
forming a tapered body.
6. Tie in the hackle feathers with the butt pointing toward the eye of the
hook and the tip of the feathers angling over and along the abdomen that
you have just formed with the dubbing. This should be done with the dull
side of the feathers facing downward.
7. Dub muskrat fur forward of the post wing to form the thorax of the fly
to just behind the eye of the hook.
8. Holding the post wing upright wind one hackle feather two times around
the base of the post wing forming the "parachute".
9. Tie off the leftover end of the hackle feather just behind the eye of
the hook.
10. Trim the excess hackle feather.
11. Repeat steps 8 and 9 with the other hackle feather.
12. Trim the excess hackle feather and trim the post wing to desired height.
13. Whip finish. Note that many people like to use a hackle guard in the
whip finish process to hold the hackle out of the way. If you don't have a
hackle guard one can be easily fashioned from a circle of stiff plastic
with a hole in the center and a slit cut from the edge to center. Making
it out of clear plastic has the added advantage of letting you see what you
are doing better. If you don't want to use a hackle guard then try taking
a couple of half hitches and using some head cement to finish the fly.
Whip finishing a parachute without a hackle guard can be almost impossible
if you are using a whip finishing tool. This is a place where you need to
learn to whip finish by hand, use a hackle guard, or use a couple of
half-hitches.
Variations:
The Sulphur
Hook: Mustad 94840, TMC 100, etc. #14-18
Thread: Pale Yellow
Wing: Post wing of white or dun polyester yarn
Tail: 2 pale yellow to tan microfibetts tied in as a split tail, or a few
cream hackle fibres
Body: Pale yellow to orange dubbing
Hackle: Cream hackle fibres wound parachute style around the post wing
The Blue Winged Olive
Hook: Mustad 94840, TMC 100, etc. #16-20
Thread: Olive
Wing: Post wing of white or dun polyester yarn
Tail: 2 medium to dark dun microfibetts tied in as a split tail, or a few
dun hackle fibres
Body: Olive, olive-brown, or olive-grey dubbing
Hackle: Medium to dark dun hackle fibres wound parachute style around the
post wing.
BACK TO FLY TYER'S DESK INDEX


ldecuir@utkux.utcc.utk.edu