Kentucky Pesticide Safety Education Program


Questions?
Contact
Dr. Ric Bessin
Dept. of Entomology
University of Kentucky
859-257-7450
rbessin@email.uky.edu
Planning is essential before beginning a pesticide application. To help plan, you should know how to:
![]() Select the right pesticide for the job.
Select the right pesticide for the job.
![]() Review the label.
Review the label.
![]() Test for pesticide compatibility before mixing.
Test for pesticide compatibility before mixing.
![]() Choose what personal protective equipment to wear.
Choose what personal protective equipment to wear.
![]() Transfer pesticides safely.
Transfer pesticides safely.
![]() Clean up after an application.
Clean up after an application.
Careful planning and consideration of all details is the hallmark of professionalism.
Selecting the Pesticide
When choosing the right pesticide for your particular situation, it is critical to determine whether the pesticide can be used safely under the application conditions. You also need to determine how much product is required for the area you are treating. Before purchasing or applying the pesticide, read the label to determine:
- Safety measures to follow.
- Where you can legally use it (i.e., target sites).
- When to apply it (considering factors such as the life cycle of the pest, weather conditions, pre-harvest and/or grazing interval, and the rotational or replanting interval).
- How to apply it (e.g., selecting and setting up equipment; following label directions).
- If there are any special use restrictions (e.g., restricted entry intervals or prohibitions against certain types of application methods or equipment).
- Whether there are other restrictions (e.g., environmental conditions, setbacks or buffers, and drift warnings).
[return]
Reviewing the Pesticide Label
 Review the label carefully and to apply the pesticide as directed. The "Directions for Use" section lists the various crops, animals, or sites on which you may legally use the pesticide. It also lists the target pests, application rates, spray quality (droplet size) specifications, and general application methods.Also check for instructions on sprayer cleanout, proper storage and disposal of empty containers.
[return]
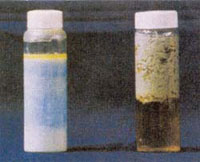
Determining Pesticide Compatibility
Tank mixing two or more pesticides can save time and labor. However, it can reduce the effectiveness of one or more of the products. Determine the compatibility of your products before mixing them.
Pesticides are compatible when they can be mixed and applied without reducing the effectiveness or changing the physical and chemical properties of the mixture.Problems develop when two or more incompatible products are mixed together.
Physical Incompatibility
Physical incompatibility may be caused by:
- Improper mixing procedures.
- Inadequate agitation.
- Lack of stable emulsifiers in some emulsifiable concentrates.
- Mixing with liquid fertilizers.
- Mixing pesticides with hard water (a pH greater than 7).
Chemical Incompatibility
Chemical incompatibility occurs when mixing certain pesticides in the spray tank alters the activity of one or more of them. In other words, a chemical reaction takes place and produces new substances. Clues indicating chemical incompatibility may include heat, a color change, the formation of a gas or a precipitate, the appearance of surface scum or foam, or the formation of gel or "sludge." The resulting mixture is different from the products applied separately.
There are two types of chemical incompatibility. Antagonism occurs when the pest control activity of at least one of the components in a tank mix is reduced when two or more products are mixed.
Synergism occurs when the activity of two or more products applied together is greater than if each pesticide were applied separately. The increased effectiveness may damage desirable plants. Some product labels list pesticides (and other chemicals) known to be compatible with that formulation. Many have very helpful tank-mixing instructions. If you cannot find information about tank mixing on one or more products you wish to combine, do a "jar test" with a small amount of the mixture before you mix a large quantity.
Remember, it is illegal to mix pesticides with other products (e.g., other pesticides, adjuvants, or carriers) when such mixtures are expressly prohibited on the label. Also, if a tank mix contains a pesticide that has a higher toxicity level (e.g., DANGER) than the other pesticides (e.g., WARNING or CAUTION), treat the entire mixture according to the more restrictive signal word (e.g., as a DANGER pesticide). You must use the required safety equipment and follow all other label requirements found on the label with the greatest restrictions.
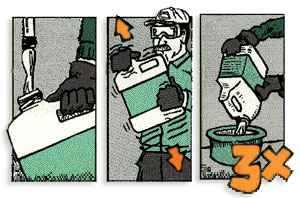
Conducting a Compatibility Test
To conduct a jar (compatibility) test, use a small glass or plastic container. Mix proportionate amounts of all the carrier and products you intend to combine in the spray tank. Start by filling the jar one-fifth to one-half full with the carrier (water or liquid fertilizer). Then add proportionate amounts of each product, one at a time, in the order suggested under "Making Tank Mixes".
Shake the jar thoroughly after each product is added. Allow the mixture to stand for 10 to 15 minutes. If flakes, sludge, gel, precipitates, or other solids form; the products separate into layers; or heat is given off, the products cannot be safely tank mixed. Adding compatibility agents may improve the mixing of the ingredients.
Certain kits can help you test for compatibility. There are also online sources as well as smartphone apps to help you determine the proper mixing order for various tank mix components.
Making Tank Mixes
Follow correct mixing procedures to minimize compatibility problems with tank mixes. Add and thoroughly mix the products, one at a time, beginning with those that are hardest to mix. To ensure thorough mixing of dry formulations before adding them to the mixture, make a pre-slurry-mix the products with a little water to form a paste before adding them to the tank mix. To be certain you have a uniform spray mixture at all times, keep the mixture agitated during the entire application until the tank is empty.
Tank Mixing Order
- Fill tank one-fifth to one-half full with carrier (e.g., water or liquid fertilizer). Start agitation.
- Add compatibility agent (if needed).
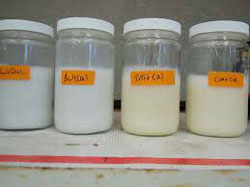
- Add suspension products: first, dry formulations-wettable powders (WP), dry flowables (DF), water-dispersible granules (WDG) (as a preslurry, if necessary), then liquids-flowables (F), liquids (L), microencapsulated (ME).
- Add solution products-solutions (S), soluble powders (SP).
- Add surfactants or other adjuvants (if needed).
- Last, add emulsion products-emulsifiable concentrates (EC).
[return]
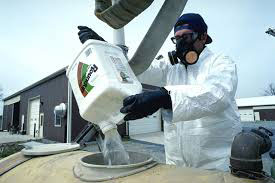
Follow Safe Mixing and Loading Practices
People who mix and load concentrated pesticides have an especially high risk of accidental exposure and poisoning. Observe the following precautions to reduce the risks involved with this part of the job.
Locate the pesticide mixing and loading area in a well-ventilated (if indoors), well-lighted place away from people, animals, food, and other items that might be contaminated.
Protect water sources by ensuring that no tank mixture can back-siphon into a water source. Leave a distinct air gap when filling a tank using a water pipe or hose. Place the pipe or hose end well above the surface of the pesticide mixture between the two. If water is pumped directly from the source into a mix tank, use a check valve, anti-siphoning device, or backflow preventer to prevent back-siphoning if the pump fails. The backflow preventer has a mechanism that automatically closes if a drop or loss of water pressure occurs. Check valves are crucial for chemigation and similar systems where pesticides are injected into irrigation water.

Mix pesticides in areas where any spills, leaks, and overflows cannot flow toward a drain or into water sources. If using a permanent mixing and loading site, use a containment pad (see Chapter 11, Pesticide Application Procedures). When possible, mix and load the pesticides at the application site. Be careful not to use the same site repeatedly, and do not contaminate any water sources.
Use Personal Protective Equipment
Be sure to wear appropriate personal protective equipment (PPE) when handling pesticide containers, even before opening them. Pesticide handlers must wear all of the PPE that the pesticide labeling requires. This may include:
- Body protection-Wear a bib-top apron made of butyl, nitrile, or foil-laminate material in case you get splashed while mixing and loading or come in direct contact with contaminated equipment. The style that includes built-in gloves and sleeves is especially protective.
- Face protection-Wear a face shield to keep splashes and dusts off your face, nose, and mouth while pouring liquid pesticides or adding dry pesticides to a liquid.
- Respiratory protection-Wear the appropriate respirator when handling pesticides. Choose one with the National Institute for Occupational Safety and Health (NIOSH) code given on the pesticide product label.
- Eye protection-Wear shielded safety glasses, goggles, or a face shield to protect your eyes.
Open Containers Carefully
Do not tear open paper or cardboard containers. Use a sharp knife or scissors. This reduces the danger of spilling and makes bags easier to close after use. Clean the knife or scissors afterward, and do not use them for other purposes. To prevent spills, close containers after each use even if you plan to mix more of the same pesticide.
Measure Accurately
 Liquids and some granular pesticides are measured by volume; dusts, powders, and most dry formulations are measured by weight. Pesticide labels use the English system of measurement (i.e., fluid ounces, pints, quarts, and gallons for liquids; pounds and ounces for dry materials). Use an assortment of glass or plastic measuring utensils, from 1 cup to 1 gallon, to accurately measure liquids. Some pesticides react with metal-especially aluminum and iron-so avoid using metal measuring utensils. Wear proper PPE when mixing and loading.
Use an accurate scale and a set of measuring cups and spoons to measure and weigh dry pesticides. Mark each pesticide measuring item clearly to avoid using it for other purposes. To prevent accidental poisonings, paint handles with brightly colored waterproof paint or attach waterproof warning labels. After each use, clean and wash utensils before storing them to prevent contaminating future mixtures. When you are not using them, keep all measuring and weighing equipment and utensils locked in the pesticide storage area.
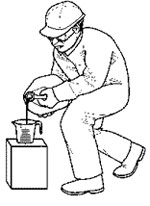
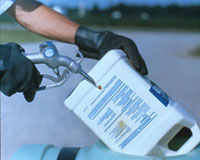
Transfer Pesticides Carefully
After measuring or weighing the correct amount of pesticide, carefully add it to the partially filled spray tank. When pouring, keep the container and pesticide below face level. If there is a breeze outdoors or strong air current indoors, stand so the pesticide cannot blow back on you. Rinse the measuring container thoroughly and pour the rinsate into the spray tank. Use caution while rinsing to prevent splashing. Never leave the spray tank unattended while it is being filled. When transferring wettable powders, dusts, or other dry formulations, avoid spillage and inhalation of dusts.
Keep container and pesticide below face level when pouring.
[return]
Cleaning and Disposing of Pesticide Containers
Follow the container-handling instructions on the pesticide label. The instructions will tell you how to clean and dispose of an empty container. Not all containers must be triple-rinsed or pressure-rinsed. If rinsing is required, follow the directions on the label and rinse immediately after emptying the container. Otherwise, residues may become difficult to remove if allowed to dry. If possible, add the rinsate to the next application.
Do not leave pesticide containers unattended at a mixing, loading, or application site-return them to a secured storage area until they can be recycled or disposed of properly. Clearly mark and safely store them. Follow the label directions on what to do with an empty container. If a pesticide label says it is a "refillable" container, it will have instructions to return the container to the pesticide dealer or manufacturer for refilling. Never tamper with a container designed to be returned and refilled. If it is a "nonrefillable" container, the label will tell you whether you can recycle, recondition, or dispose of the container and the manner of disposal.
Never reuse pesticide containers. Contact the Kentucky Department of Agriculture (http://www.kyagr.com/consumer/pest-and-recycling.html) to locate the nearest pesticide container collection point.
Container Rinsing Procedures
Follow rinsing instructions on the product label.
For small containers 5 gallons or less, triple rinse as follows: Empty the remaining contents into application equipment or a mix tank (drain for 10 seconds after the flow begins to drip). Fill the container one quarter full with water and recap. Shake for 10 seconds. Pour rinsate into application equipment or a mix tank or store rinsate for later use or disposal. Drain for 10 seconds after the flow begins to drip. Repeat this procedure two more times.
For containers too large to shake (i.e., with capacities more than 5 gallons or 50 pounds), triple rinse as follows: Empty the remaining contents into application equipment or a mix tank. Fill the container one-quarter full with water. Replace and tighten closures. Tip container on its side and roll it back and forth, making at least one complete revolution, for 30 seconds. Stand the container on its end and tip it back and forth several times. Turn the container over onto its other end and tip it back and forth several times. Empty the rinsate into application equipment or a mix tank or store rinsate for later use or disposal. Repeat this procedure two more times.
For bags or liners: Completely empty bag or liner by shaking and tapping sides and bottom to loosen clinging particles. Empty residue into application equipment or a mix tank or store for later use or disposal.
 To pressure rinse containers: Empty the remaining contents into application equipment or a mix tank (drain for 10 seconds after the flow begins to drip). Hold container upside down over application equipment or a mix tank or collect rinsate for later use or disposal. Insert pressure-rinsing nozzle in the side of the container and rinse at about 40 pounds per square inch for at least 30 seconds. Drain for 10 seconds after the flow begins to drip.
[return]
Applying Pesticides Correctly
Applicators have many important responsibilities when applying pesticides: protecting themselves, others, and the environment and applying it correctly. This means using proper PPE and following correct application procedures.
Personal Protective Equipment
By law, applicators must wear the PPE and other clothing the pesticide labeling requires. Consider using additional protection for some types of pesticide application tasks.
Hand-Carried and Backpack Applications
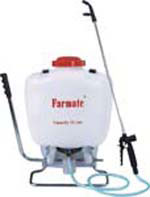 Exposure is quite likely when applying pesticides using hand-held equipment or dust shakers. Dripping or partially clogged nozzles, leaky hoses, and loose equipment connections are other potential sources of exposure. Many applications performed on foot cause the applicator to walk into the path of the pesticide being applied. Whenever possible, apply pesticides so you are backing out of the treated area. If you must walk into the path of the pesticide, consider wearing shin-high or knee-high rubber boots (or other protective footwear) with spray-resistant or waterproof pants. Wear appropriate protective clothing and equipment when entering treated areas to fix clogged nozzles or other malfunctioning equipment parts.
High-Exposure Applications
Certain types of pesticide applications are especially risky because they may expose the applicator to large amounts of pesticide. These include:
- Mist blower or air-blast sprayers.
- Aerosol and fog generators.
- High-pressure sprayers and power dusters.
- Equipment that directs applications overhead, such as to tree canopies or roof eaves.
Pesticide exposure is likely whenever you are working in these situations. For high-exposure applications, use appropriate gloves, protective coveralls with a hood, footwear with sealed cuffs, and a full-face respirator or half-face respirator with sealed goggles.
Pesticides are sometimes applied in enclosed spaces, such as warehouses, factories, restaurants, and homes; railcars; ship and truck cargo areas; silos, elevators, and other grain storage areas; and greenhouses. This increases the risk of inhalation and dermal exposure. Wear an approved respirator and additional protective clothing, even if you would not need them for the same application outdoors.
Application Procedures
To ensure that pesticides are being applied properly, follow these basic procedures:
![]() Before applying a pesticide, clear all people and pets from the area. Remove toys and pet dishes from the application area and cover garden furniture, swimming pools, and birdbaths. Check the pesticide label to find out when it is safe to return to the application area. If the label does not include specific restricted-entry statements, keep people and non-target animals out of the treated area until the spray has dried or the dust has settled.
Before applying a pesticide, clear all people and pets from the area. Remove toys and pet dishes from the application area and cover garden furniture, swimming pools, and birdbaths. Check the pesticide label to find out when it is safe to return to the application area. If the label does not include specific restricted-entry statements, keep people and non-target animals out of the treated area until the spray has dried or the dust has settled.

Be aware of wind speed, direction, and nearby sensitive areas.
![]() Ensure that the pesticide is reaching the target surface or area. Be sure to remove pesticide granules from sidewalks and other non-target areas.
Ensure that the pesticide is reaching the target surface or area. Be sure to remove pesticide granules from sidewalks and other non-target areas.
![]() Apply the pesticide evenly and in the correct amount. Do not allow liquid pesticides to form puddles or dry pesticides to pile up in the application area. Be especially careful in places where you turn or pause your equipment. You may have to shut off your equipment in these areas.
Apply the pesticide evenly and in the correct amount. Do not allow liquid pesticides to form puddles or dry pesticides to pile up in the application area. Be especially careful in places where you turn or pause your equipment. You may have to shut off your equipment in these areas.
![]() Ensure that the pesticide maintains a uniform mix or appearance during the application. Several pesticide formulations mixed with liquid require agitation to remain in suspension. Granules and dusts should appear dry and not form clumps on the target site.
Ensure that the pesticide maintains a uniform mix or appearance during the application. Several pesticide formulations mixed with liquid require agitation to remain in suspension. Granules and dusts should appear dry and not form clumps on the target site.
![]() Check hoses, valves, nozzles, hoppers, and other equipment parts often during the application.
Check hoses, valves, nozzles, hoppers, and other equipment parts often during the application.
![]() Turn spray equipment off when you pause for any reason. Maintain agitation if the spray mix is a suspension of particles (such as wettable powders, flowables, or dry flowable formulations). Whenever you stop an application, depressurize spray tanks. Turn off the main pressure valve on the tank and release the pressure remaining at the nozzles.
Turn spray equipment off when you pause for any reason. Maintain agitation if the spray mix is a suspension of particles (such as wettable powders, flowables, or dry flowable formulations). Whenever you stop an application, depressurize spray tanks. Turn off the main pressure valve on the tank and release the pressure remaining at the nozzles.
![]() Check the label for any post-application requirements, such as soil incorporation.
Check the label for any post-application requirements, such as soil incorporation.
[return]
Professionalism
As a certified pesticide applicator, you do important work and provide valuable services. These services include:
- Producing a safe and plentiful food and fiber supply.
- Protecting public health from vector-borne diseases.
- Creating value for property owners through their landscapes and structures.
- Protecting land and water ecosystems from invasive species.
- Enhancing the public's quality of life through parks and other recreation venues.
- Creating safe roadways and other rights-of-way.
What you do and how well you handle yourself while on the job will leave an impression on others. These expectations of conduct and your actions in specific situations create your professional image, best summed up as "professionalism."
What Is Professionalism?
Merriam-Webster defines professionalism as "the skill, good judgment, and polite behavior that is expected from a person who is trained to do a job well." The heart of professionalism for a pesticide applicator is exercising good judgment when there are no clear-cut right or wrong options. Professionalism includes fair treatment of customers, respect for others, and being an asset to your community.
While regulatory compliance is necessary, you as an applicator or a supervisor will need the expertise and good judgment to make decisions on issues affecting security, safety, health, or the environment not addressed by regulations or the pesticide label.
You should:
- Study this manual to help you gain the basic knowledge needed to educate your customers and others who are concerned about pesticides.
- Educate others about the work you do.
- Know how to minimize risks to yourself, coworkers, the public, and the environment.
- Learn how to communicate the benefits and risks of pesticide use with your customers, coworkers, and the public. The impression you make on others depends on your ability to answer questions from customers, neighbors, and others about the work you do.
Demonstrate Professional Ethical Standards
A professional demonstrates ethical behavior in all aspects of his or her work. This means not taking shortcuts that may harm your customers, the public, or the environment. Offer honest and knowledgeable advice, keeping in mind the best interests of others.
Integrated pest management is also part of your professional training because it helps you make sound pest management decisions, apply pesticides only when needed, and protect sensitive sites from harm.
Communicate with Customers, Neighbors, and the Public
Being a professional involves knowing the correct terminology when discussing your work and communicating with others. When speaking with the public, it is better to use simple, direct language than to use technical jargon. Be proactive and reach out to neighbors, customers, and others who may have concerns about a nearby sensitive site where you are applying pesticides. Inform others that you are a professionally certified and trained pesticide applicator. Explain what that means because many people will not know. Be familiar with your company or organization policy for talking to customers, neighbors, or the media.
Keep accurate records of all your pesticide applications. Good records provide the facts of what you did and demonstrate your care in the work you do. If there is a complaint or legal action following an application, having good records may be your most valuable defense. Having no or insufficient records makes you vulnerable to baseless accusations and additional scrutiny.
Being an effective pesticide applicator is more than just the skills and knowledge needed to conduct an application. It also requires good judgment, polite behavior, and a professional demeanor.
[return]
Visits since 4/14/16
Photo credits: Incompatible chemicals | Jar test | Mixing and loading | Pouring chemicals |
Container rinsing | Jet rinsing | Backpack sprayer | Aware of sensitive areas
website design by P.M. Dillon copyright © 2015 University of Kentucky Department of Entomology
University of Kentucky College of Agriculture |
S-225 Agricultural Science Center North, Lexington, KY 40546-0091 | 859.257.7450
An Equal Opportunity University |
Last modified
11/30/2018